
Yes, damaged drywall can almost always be repaired. The real question is what caused it, because the cause decides whether you need a dab of joint compound or a cut-out section of wall. Drywall repair means restoring the panel surface, the seams and the texture so the damage stops being visible and stops coming back.
Most homeowners skip straight to filler. That’s how patches end up cracking again in six months. Diagnose first, fix second.
Quick diagnosis: what the drywall damage is telling you
Match what you see to the likely cause below, then check the urgency column before you touch anything.
| Symptom | Likely cause | Urgency | DIY or pro |
|---|---|---|---|
| Round hole at doorknob height | Impact damage | Low | DIY under 2 inches, pro for larger |
| Hairline crack above a door or window | Seasonal or minor settling movement | Low | DIY |
| Wide, diagonal or stepped crack | Framing or foundation movement | Moderate to high | Pro |
| Small round bump or ring around a fastener | Nail pop from lumber shrinkage | Low | DIY |
| Ridge or lifted line along a seam | Failed tape bedding or moisture | Low to moderate | Pro for a clean blend |
| Yellow or brown ring, panel still firm | Corrected leak, surface staining only | Low | DIY with stain-blocking primer |
| Soft, spongy or crumbly spot | Active or recent water intrusion | High | Pro |
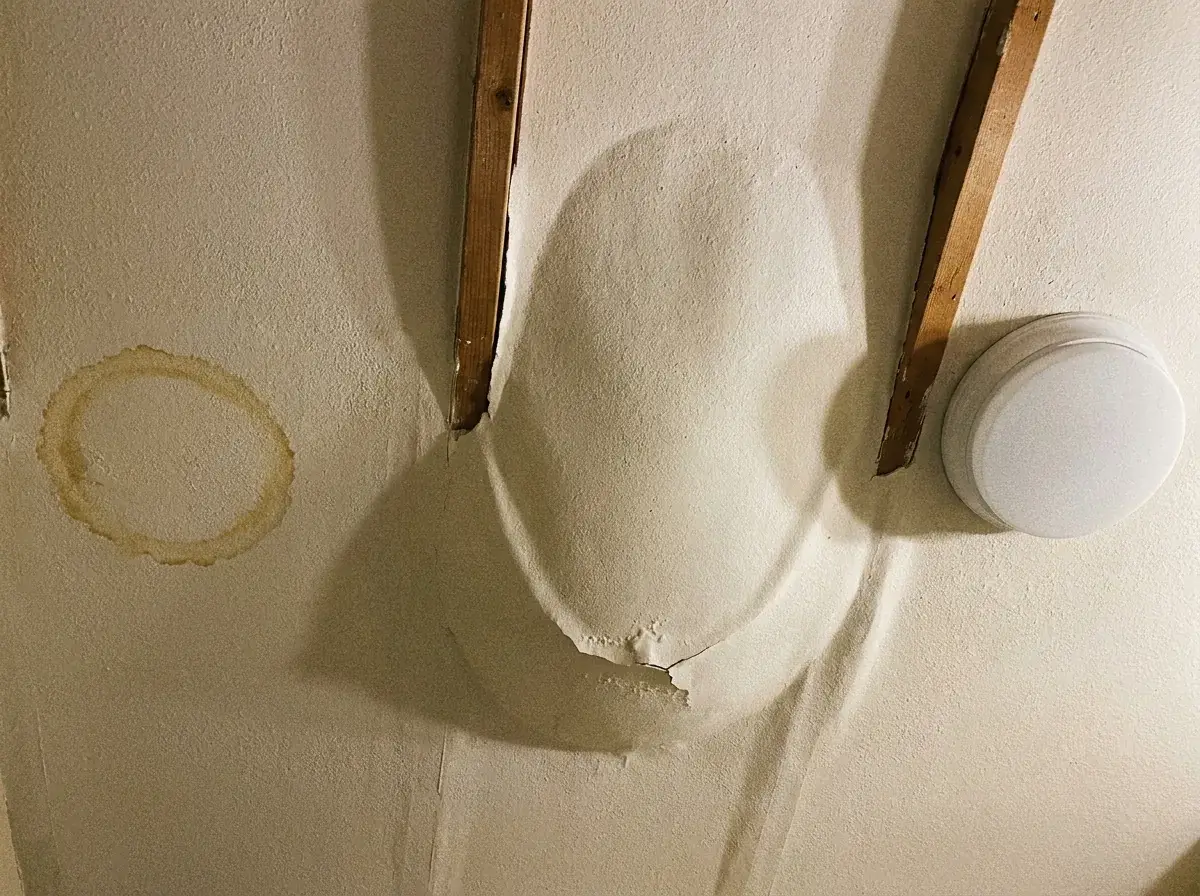
| Sagging or bulging ceiling | Saturated panel pulling from framing | Urgent | Pro |
| Musty smell with no visible damage | Hidden moisture behind the panel | High | Pro |
Two quick tests settle most cases:
- The press test. Push gently with two fingers. Firm and solid means cosmetic. Spongy, soft or crumbling means water has broken down the gypsum core.
- The pattern test. Cracks at joints and corners that stay the same width for months are cosmetic. Cracks that widen, step diagonally, or show up alongside sticking doors and misaligned trim point at movement in the structure.
When drywall damage is urgent
Act today if there’s water, sagging, or anything electrical involved. Everything else can wait a few days without getting worse.
WARNING: stop and call a professional now if you see any of these.
- A ceiling that sags, bulges or feels heavy and damp. A saturated panel can let go all at once, usually along a seam or fastener line.
- Water dripping or spreading while you watch.
- Soft or stained drywall around an outlet, switch or light fixture. Assume a shock risk and kill the breaker for that circuit.
- Visible black or green spotting, or a musty smell that stays after the area dries.
- A large opening exposing wiring, plumbing or insulation.
Mold needs almost no time to get started. Wet drywall can grow it in 24 to 48 hours, according to PTT’s drywall water damage repair guide. Water emergencies aren’t rare either. More than 14,000 people in the U.S. deal with one at home or work every single day.
What can wait: hairline cracks, nail pops, doorknob holes, dents from furniture, and old stains on a panel that’s firm and dry. Those are cosmetic. Fix them on your schedule.
One note on scope. Precision Patch Pros handles the drywall side of water damage, the cutting, patching, texture and paint. Water extraction, emergency dry-out, leak detection and mold remediation are separate trades and need to happen first.
Impact holes and dents
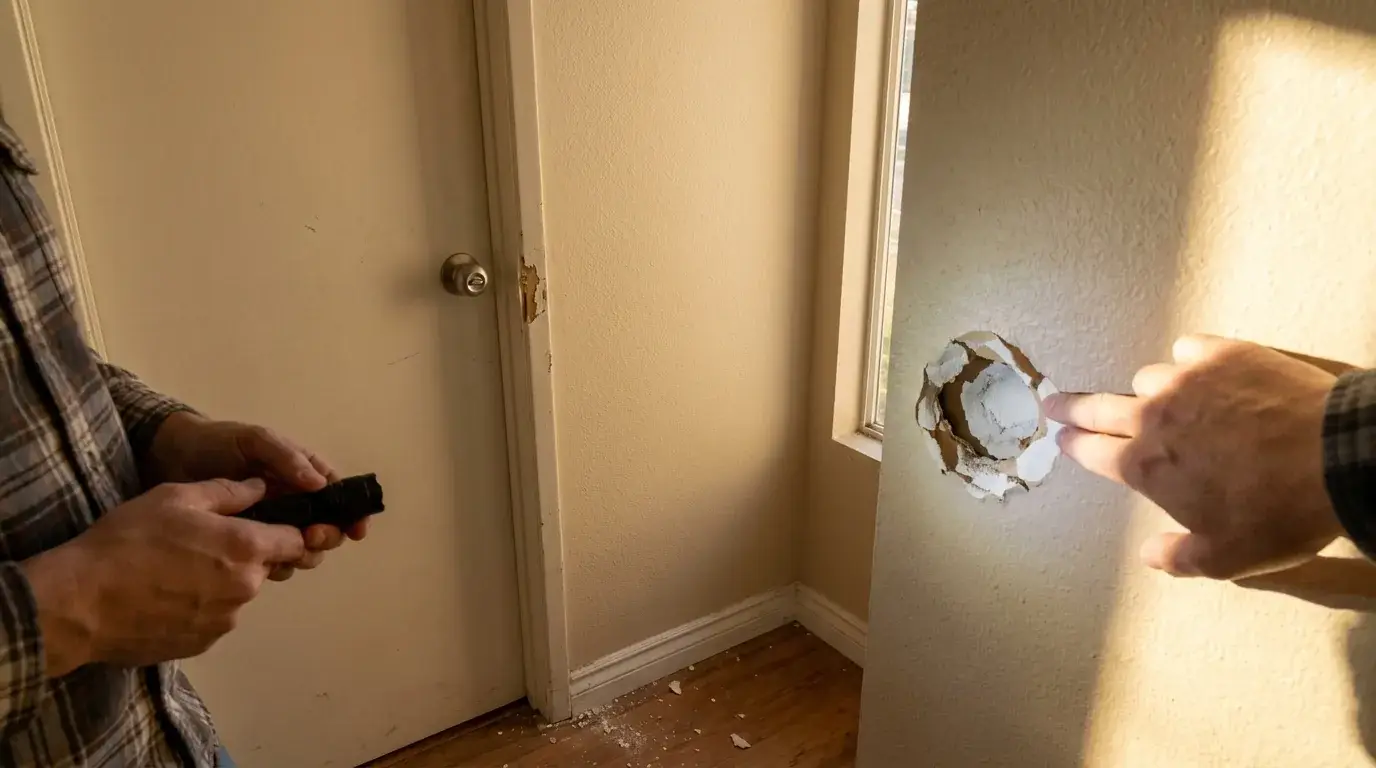
Impact damage is the most common drywall problem in a house, and it’s the easiest to confirm. Look at the height. Doorknob height, chair-rail height, or the path a couch took down a hallway. The gypsum is crushed or cleanly punched, and the area around it feels firm and dry.
The fix depends on the opening:
- Dents and nail holes. Lightweight spackle, one thin coat, sand, prime, paint.
- Holes up to about 2 inches. Self-adhesive mesh patch bedded under two or three feathered coats of compound.
- Holes from 2 to 6 inches. Cut the ragged edges square, add wood backing behind the opening, screw in a drywall plug, then tape and float the joints.
- Anything over 6 inches. Cut back to the studs on both sides so the new piece lands on solid framing.
Method choices by hole size, including the California patch, are covered in “Quick Drywall Repair Step-by-Step: When to Use Spackle, Mesh Patch, or a California Patch.”
Left alone, a small hole mostly stays a small hole. The exceptions matter. An opening that exposes wiring is a shock and fire concern. A doorknob hole that keeps getting hit will crumble wider each time until the patch needs backing anyway. And in a rental, a row of small holes at move-out inspection reads as damage, not wear.
Cracks from settling or framing movement
The difference between a cosmetic crack and a movement problem is width, direction and behavior over time. Hairline cracks at drywall joints, above door frames or where a wall meets the ceiling come from seasonal expansion and normal settling. They stay the same width. Tape them and they’re done.
A movement crack shows different cues:
- Wider than a hairline, roughly 1/8 inch or more, and one side sits slightly proud of the other.
- Diagonal or stepped, running away from a corner rather than following a seam.
- It reopens within a year of a proper repair, in the same line.
- It comes with company: doors that stick, windows that bind, trim gaps that weren’t there last year.
- It keeps growing. Mark the ends with a pencil and date them. Re-measure in 60 days.
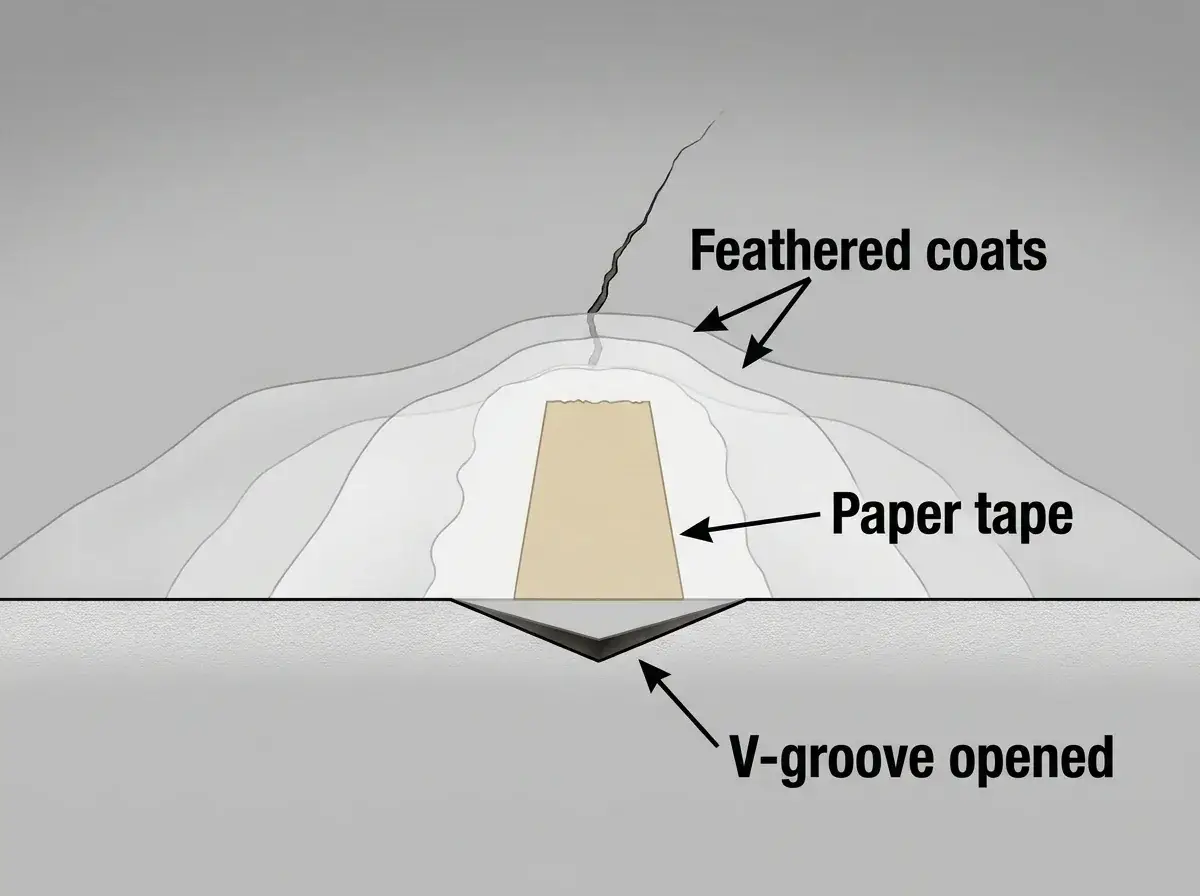
Here’s what most guides skip. Mud has no tensile strength. Smearing compound into an active crack gives the movement a brittle, unreinforced strip to break, so the crack returns almost exactly where it was. That’s why repeat patching fails. A reinforced repair, meaning the crack opened into a V, paper tape bedded across it, then feathered coats, survives normal seasonal movement. Real structural movement has to be addressed at the source before any drywall work is worth paying for.
Ignore a widening crack and you get more than a line on the wall. You lose the chance to catch framing or foundation movement while it’s cheap to correct.
Nail pops and fastener movement
A nail pop is a small raised bump or a ring-shaped crack sitting directly over a fastener. Press it. If the panel flexes or you hear a faint click, the fastener has lost its grip and the drywall isn’t tight to the stud anymore. They often show up in clusters along a single stud line.
This one gets misdiagnosed as bad workmanship. Usually it’s lumber shrinkage. Framing dries out, the stud pulls back from the nail head, and the panel lifts. Normal house behavior in a dry climate like Kern County and the high desert.
The fix that holds:
- Scrape off the loose compound and expose the fastener head.
- Drive a drywall screw 1 to 2 inches above or below it, into the same stud, until the head dimples just below the surface without tearing the paper face.
- Reset or remove the original nail.
- Two or three thin coats of compound over both fasteners, each one wider than the last.
- Sand, prime, texture to match, paint.
Skip step 2 and you’ve filled a divot over a fastener that’s still loose. It pops again within a year, usually after the first big temperature swing. Widespread pops across a whole ceiling are worth a second look, since they can signal the panel was never properly fastened.
Not sure which category you’re looking at? Send 2 to 3 pictures and your zip code and you’ll get a quote back within 10 minutes, no visit needed to start.
Water stains, soft spots, and sagging drywall
Water damage splits into three outcomes, and the press test plus a moisture reading tell you which one you have. Firm and dry means you can prime and paint. Swollen or slightly bowed means dry it fully, then decide. Soft, spongy, crumbling or sagging means the panel comes out.
Run through this before choosing:
- Is the leak fixed? No repair holds over an active source.
- Is it dry? Give it days, not hours, with air movement. A moisture meter should read close to the reading on an undamaged wall in the same room.
- Does it smell? A musty odor with no visible damage means moisture is still sitting in the cavity or behind the panel.
- How much sag? More than about 1/4 inch of sag between studs means the gypsum core has failed. Replace it.
The contrarian part: light staining doesn’t automatically mean replacement. A firm, fully dry, mold-free panel with a brown ring only needs a stain-blocking primer (an oil or shellac-based one), then paint. Water-based primer lets tannin stains bleed straight back through.
What happens if you paint over damp or musty drywall? You seal moisture in. Paint film slows evaporation, mold keeps feeding on the paper facing where you can’t see it, and the stain usually reappears within weeks. Meanwhile the gypsum keeps softening until the patch, or the ceiling, gives way.
Ceilings and bathrooms are harder for two reasons: gravity and humidity. Overhead, use setting-type compound rather than lightweight all-purpose, because it hardens chemically instead of air-drying and resists sagging in thick coats. Fasten replacement pieces every 8 to 10 inches on ceiling framing rather than 12. And expect extra drying time in a bathroom before texture or paint, since ambient humidity slows everything.
When a patch should be replaced instead
Patch when the surrounding panel is sound. Replace the section when it isn’t. Use these thresholds:
- Openings over about 12 inches across. Cut back to the studs and install a full piece. A floating patch that size flexes and telegraphs a crack line.
- Ceilings with any softness or sag. Overhead panels carry their own weight plus insulation. Weakened gypsum won’t hold fasteners.
- Three or more failed repairs in the same spot. The problem isn’t the patch. It’s the substrate or the movement behind it.
- Delamination. If the paper facing separates from the core, or the surface peels in sheets, there’s nothing left for compound to bond to.
- Multiple holes within a couple of feet of each other. One clean cut-out to the nearest studs finishes cleaner and faster than four blended patches.
- Mold on the back of the panel. Surface cleaning leaves the contaminated core in place.
In one recent job, a dated coffered dining room ceiling needed the section reframed and new drywall hung, taped and floated, with LED recessed lighting added, then skim-coated and retextured so the whole ceiling read as one uniform finish. That’s what replacement-level work looks like when patching would have shown every seam.
The thresholds for a bigger cut-out versus a patch, plus how each affects the timeline, are covered further in “Sheetrock Drywall Repair: What to Expect Step by Step.”
When to hire a drywall pro
A handyman can fix drywall. Whether the repair disappears is a different question. The dividing line is finish quality, and it shows up in four places: texture matching, ceiling work, water damage, and anything a window will side-light.
Hire a specialist when:
- The wall has texture. Orange peel, knockdown and popcorn need the right spray pattern, the right mix consistency and practice passes on scrap before touching the wall. Getting close isn’t the same as matching.
- It’s a ceiling. Overhead work with setting compound, sag risk and raking light from fixtures is the hardest surface to make invisible.
- Water was involved. Somebody has to judge dryness, cavity condition and whether the panel is sound, before the finish work starts.
- Side light hits the wall. Low-angle sunlight exposes every high spot and every unprimed patch. A repair that looks perfect head-on can flash badly at 4 p.m.
“Can I just paint over ripped drywall?” No. Torn paper facing absorbs paint unevenly and stays fuzzy. It needs to be sealed with an oil-based or shellac primer, skimmed smooth, then finished.
Beginners do fine on nail holes and small dents. The skill gap opens between filling a hole and finishing it so nobody can find it. That last part, feathered blending, matched texture and paint touch-up, is the whole job.
Precision Patch Pros is licensed and insured (CSLB License #830875) and has served Southern California since 2020, from Bakersfield and the Antelope Valley through Santa Clarita and the San Fernando Valley. Most jobs finish in one visit, patch, texture match and paint touch-up together, with a 5-year workmanship guarantee. What repair typically runs by size is broken down in “Drywall Repair Guide: Costs, Options and When to Hire.”
Get your photo quote in 10 minutes and know exactly what your repair needs before you buy a single tool.
Frequently Asked Questions
How big of a hole can drywall repair fix?
There’s no upper limit on what can be repaired, only on what should be patched versus replaced. Holes up to about 6 inches take a backed drywall plug. Above roughly 12 inches, cutting back to the studs and installing a fresh piece is the more reliable route.
Is it safe to clean mold off drywall myself, or do I need to remove the drywall completely?
Surface mold on a small, firm, painted area can sometimes be cleaned, but mold on the paper facing means the core behind it is likely contaminated too. Removal is the safer call, and it needs containment so spores don’t spread through the house. Mold remediation is a specialty trade, separate from drywall repair.
Why do my drywall seams keep cracking even after patching?
Skimming compound over loose tape re-fails every time, because the new mud is bonded to something that’s already lifted. The fix is cutting out the failed tape and loose compound, re-bedding fresh paper tape, then feathering three coats out 10 to 12 inches wide.
How can I tell if drywall damage has compromised a fire-rated wall in my condo or office?
Rated assemblies in shared walls, corridors and ceilings use a specific drywall thickness and type, commonly 5/8 inch Type X. If a patch exposes insulation or fire-blocking in one of those walls, a same-thickness, same-type replacement with properly taped joints is required to keep the rating intact. Building management or the original plans can confirm which walls are rated.
Can mold grow behind drywall after water damage?
Yes, and it’s the usual outcome when a cavity isn’t dried. The paper facing on the back of the panel and the insulation behind it hold moisture long after the surface feels dry. A musty smell with no visible staining is the most common sign.
How long should I watch a repair before I trust it?
Give it one full seasonal swing, roughly six months in the high desert and inland valleys where temperature and humidity move a lot. Cracks that reopen in that window point to movement rather than a bad patch. Nail pops that return mean the fastener was never reset.
What are the warning signs of a bad drywall repair before the paint goes on?
Run your hand across it with the lights off and a flashlight held flat to the wall. You should feel no ridge, no dish and no sanding scratches, and the compound should feather to nothing at the edges. Visible tape lines or a hump at the center mean it needs another coat and more sanding.
Does a dry climate make drywall cracks more likely?
It makes lumber shrinkage cracks and nail pops more likely, since framing loses moisture content faster in low humidity. That’s why fastener pops cluster along stud lines in desert and inland homes. The repair is the same, but resetting or adding fasteners matters more here than skimming the bump.