
Seeing a hole in your drywall from a rogue doorknob or a moment of frustration is stressful. You’re probably wondering if you can fix it yourself, how much it’ll cost, and whether your landlord or buyer will even notice. The good news: doorknob and punch holes are among the most common wall repairs, and they’re absolutely fixable. Whether you’re a tenant facing a move-out inspection in North Hollywood or a homeowner prepping for a sale, understanding the basics of this repair puts you back in control.
This guide walks you through everything a beginner needs to know. You’ll learn what these holes are, how to assess yours, what a solid DIY repair involves, when to call a pro, and realistic costs for 2026. By the end, you’ll have a clear action plan and the confidence to tackle or delegate this repair the right way.
What Doorknob and Punch Holes Are (and Why They Matter)
Doorknob and punch holes happen when a door swings open too hard, or someone’s fist meets the wall. They’re frustrating, unsightly, and often panic-inducing when you realize you need to fix them fast. In reality, these holes are routine repair jobs. Drywall is designed to be fixable. Contractors see dozens of these every week, and the materials to repair them cost under $50 from any hardware store.
A doorknob hole typically appears behind a door that lacks a stop or bumper. The knob slams into the wall, punching through the paper and gypsum. A punch hole is similar in appearance, but it’s usually the result of impact from a hand or similar-sized object. Both are frustrating. Both are fixable, and neither is permanent damage. Drywall is a forgiving material. What matters most is addressing the damage before it worsens or becomes a problem during inspections or showings.
Doorknob Holes vs. Punch Holes: Key Differences
Understanding what you’re dealing with helps you pick the right repair approach and set realistic expectations.
| Damage Type | Typical Size | Location | Common Cause | Repair Complexity |
|---|---|---|---|---|
| Doorknob Hole | 1 to 3 inches (circular) | Behind doors, usually waist-height | Door swings too hard, no wall stop | Low to medium |
| Punch Hole | 1 to 6 inches (irregular) | Hallways, bedrooms, high-traffic | Impact from hand, foot, or object | Low to high |
| Small Ding | Under 1 inch | Any wall surface | Minor impact or accidental scrape | Very low |
| Large Section | Over 6 inches | Any wall, often near corners | Severe impact or water damage | High (pro recommended) |
Both hole types share the same core issue: broken drywall paper, cracked gypsum, and an opening that needs structural support and cosmetic refinishing. The good news is that most doorknob and punch holes fall into the small to medium category and respond well to straightforward repair techniques.
Why DIY Repair Knowledge Matters
Knowing the basics of wall repair isn’t just about saving money. If you’re renting, understanding the process helps you negotiate with landlords. You’ll know whether a quoted repair is fair or inflated. You can document the damage properly and even offer to handle the fix yourself in exchange for a deposit credit. For homeowners, repair knowledge lets you budget accurately for turnover or staging projects. It also helps you spot when a contractor’s quote doesn’t match the scope of work. Whether you repair it yourself or hire someone, being informed means you get quality work at a fair price.
Step 1: Assess Your Damage
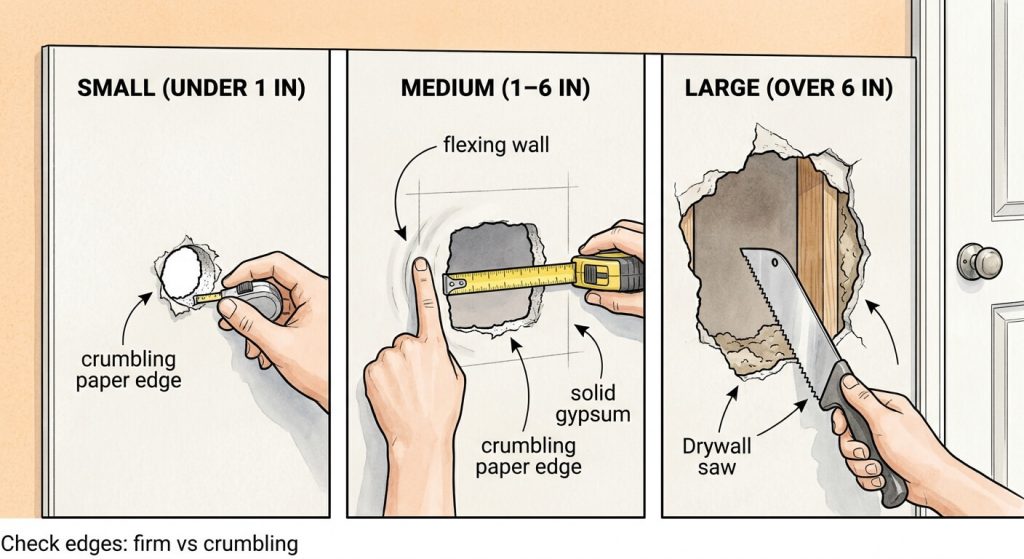
Before you grab a putty knife or call a handyman, take five minutes to evaluate what you’re actually dealing with. Not all holes need the same fix. A fingernail-sized ding won’t require the same materials or technique as a fist-sized crater. Walk up to the damaged area with good lighting and ask yourself three questions: How big is the opening? How deep does it go? What’s the condition of the surrounding drywall?
Grab a tape measure and record the hole’s diameter. Check the edges. Are they clean and firm, or crumbling and soft? Press gently on the wall around the hole. Does it feel solid, or does it flex and buckle? These observations will tell you whether you’re looking at a quick patch or a more involved repair that might need backing support or even professional help.
Small Holes (Under 1 Inch)
Small holes are the easiest fixes. If your damage is under an inch across, you’re in luck. These typically don’t penetrate the full thickness of the drywall or compromise structural integrity. A tube of lightweight spackle, a putty knife, and some sandpaper are usually all you need. This repair takes about 15 minutes of active work plus drying time. Confidence level for DIY: very high. Even if you’ve never touched drywall compound before, you can handle this.
Medium Holes (1 to 6 Inches)
Medium holes are where things get interesting. These often require more than spackle. The drywall paper is torn, the gypsum is cracked, and the opening is large enough that you’ll need a patch to bridge the gap. For holes in this range, you’ll typically use a self-adhesive mesh patch or a cut piece of drywall backed by wood or metal. The process involves several coats of joint compound, careful sanding, and attention to texture matching. Expect to spend a few hours spread over a day or two to let each layer dry. DIY is still doable, but results depend on patience and technique.
If you’re working on a home inspection repair in North Hollywood, consider reaching out to Precision Patch Pros for an expert approach. They specialize in texture-matched repairs that disappear completely, backed by a five-year guarantee.
Large Holes (Over 6 Inches)
Large holes usually signal it’s time to call a professional. These repairs often involve cutting out a damaged section and installing a full drywall patch with backing. You’ll need to precisely match wall texture and blend paint across a wide area. While technically possible for an experienced DIYer, the tools and skill required make this a borderline case. If you’re on a tight timeline, under landlord scrutiny, or working in a home with older plaster walls or heavy texture, hiring a pro is the smarter move.
Step 2: DIY Repair for Small to Medium Holes
Rolling up your sleeves and fixing the hole yourself is satisfying and can save a few hundred dollars. The process isn’t complicated, but it does require patience and attention to detail. You’ll prepare the surface, apply compound in layers, sand smooth, prime, and paint. Each step matters. Skip one, and you’ll end up with a visible patch that stands out under the right lighting.
Pro-Tip: Invest in a basic drywall repair kit from your local hardware store. These kits typically include mesh patches, a small tub of compound, a plastic putty knife, and sanding pads. They cost around $15 and give you everything you need for a beginner-friendly repair.
Tools and Materials You’ll Need
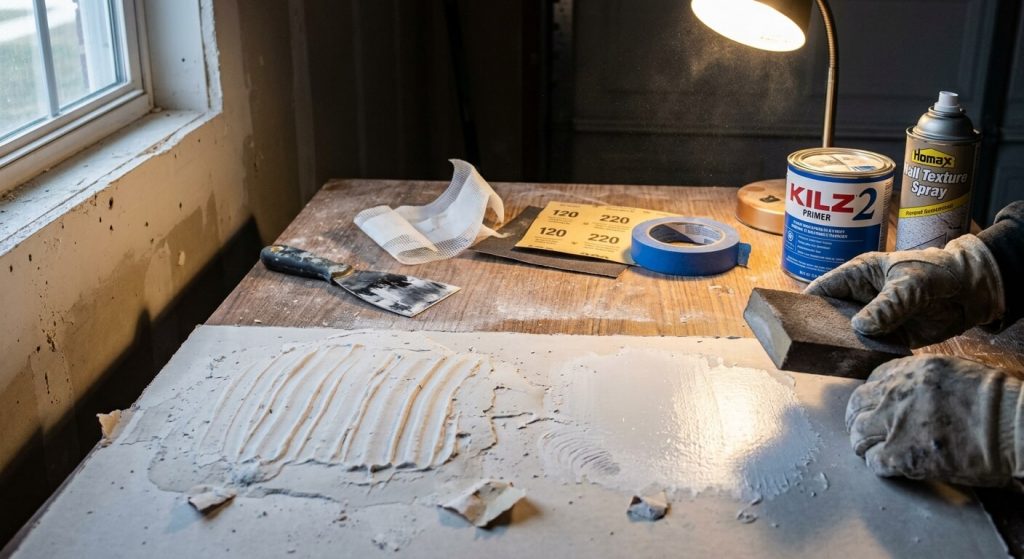
Gather your supplies before you start. Nothing’s worse than stopping mid-repair because you forgot sandpaper.
- Lightweight spackle or joint compound (small tub, $5 to $10)
- Self-adhesive mesh patch or drywall patch kit (for holes over 1 inch, $8 to $15)
- Putty knife (3-inch and 6-inch, $3 to $8 each)
- Sandpaper or sanding sponge (120-grit and 220-grit, $4 to $6)
- Primer (small can, $8 to $12)
- Paint (sample size or leftover wall paint, $5 to $15)
- Drop cloth and painter’s tape (optional but helpful, $5 to $10)
Total estimated cost for DIY materials: $15 to $40 for small repairs, $50 to $100 for medium holes requiring multiple patches or larger compound quantities.
The Repair Process (Numbered Steps)
Follow this sequence for a clean, durable result.
- Prepare the hole. Remove any loose drywall paper, dust, or crumbling edges. Use a utility knife to trim the hole into a clean shape if needed. Wipe the area with a damp cloth and let it dry.
- Apply the patch (if needed). For holes over an inch, center a mesh patch or drywall patch over the opening. Press firmly so it adheres to the wall. This gives your compound something to grip and prevents sagging.
- First coat of compound. Scoop a small amount of joint compound onto your putty knife and spread it over the patch and hole. Press firmly and smooth it out, feathering the edges so they blend into the surrounding wall. Let it dry completely, usually 2 to 4 hours depending on humidity.
- Second coat. Once the first coat is dry and slightly rough, apply a second thin layer. Extend the compound slightly beyond the first coat’s edges to blend the repair further. Let this dry overnight.
- Sand smooth. Use 120-grit sandpaper to knock down ridges and bumps. Finish with 220-grit for a smooth surface. Wipe away dust with a damp cloth.
- Prime and paint. Apply a coat of primer to seal the repair and prevent the compound from absorbing paint unevenly. Once dry, paint over the area with your wall color. You may need a second paint coat for full coverage.
- Inspect and touch up. Check the repair under different lighting. If you see shadows or texture mismatches, lightly sand and apply another thin coat of compound or an extra layer of paint.
- Install a door stop. Once the repair is complete, add a rubber door stop or wall-mounted bumper to prevent the doorknob from hitting the wall again. This simple step saves you from repeating the entire process in six months.
Common Beginner Mistakes to Avoid
Learning from others’ missteps saves time and frustration. Here are the top errors that trip up first-timers:
Over-applying compound: More isn’t better. Thick layers crack as they dry and create ridges that are hard to sand smooth. Apply thin coats and let each one dry fully.
Skipping primer: Primer seals the repair and gives paint something to grip. Without it, your patch may “flash” under light, showing a different sheen than the rest of the wall.
Not sanding enough: A rough patch looks amateurish. Take the time to sand until the surface feels smooth to the touch and blends seamlessly with the surrounding drywall.
Ignoring texture matching: If your walls have an orange-peel or knockdown texture, replicating it is essential. Practice on cardboard before you try on the wall, or consider hiring a pro for heavily textured surfaces.
Step 3: When to Call a Professional
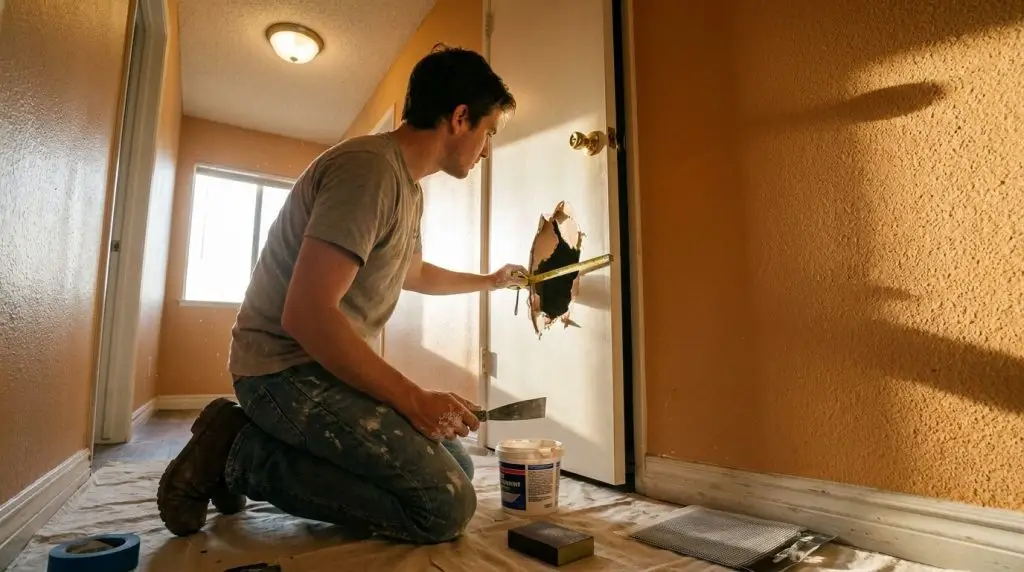
DIY isn’t always the right answer. Sometimes your timeline, skill level, or the complexity of the damage makes hiring a professional the smarter move. There’s no shame in delegating. Pros handle these repairs daily and can finish in a fraction of the time it would take you, often with better cosmetic results.
If you’re a renter with a move-out inspection in 48 hours, calling a local handyman or drywall specialist may be the only realistic option. Homeowners dealing with multiple holes, water damage, or heavily textured walls will also benefit from professional help. The key is recognizing when the cost of a pro’s time and expertise is worth more than the money you’d save doing it yourself.
Signs You Should Hire a Pro
Not every repair is a DIY candidate. Watch for these red flags that signal professional help is the better path:
- Deep or structural damage: If the hole exposes framing, wiring, or plumbing, or if the drywall around the hole feels soft or crumbles easily, you need a contractor who can assess and repair structural issues.
- Multiple damage points: Three or more holes scattered across different rooms turn a quick project into a time sink. A pro can knock out a punch list in one visit.
- Tight deadline: If you have less than a week before an inspection or showing, a pro’s speed and guaranteed results are worth the investment.
- Older plaster walls: Homes built before the 1950s often have plaster over lath instead of drywall. Plaster repairs require different materials and techniques. Attempting a drywall patch on plaster often fails.
- Complex texture matching: Orange-peel, knockdown, and popcorn textures are hard to replicate without practice and the right tools. If your walls have heavy texture, a pro will save you from a patch that screams “amateur repair.”
DIY vs. Professional: A Quick Decision Matrix
Use this table to weigh your options based on your situation.
| Factor | DIY Repair | Professional Repair |
|---|---|---|
| Cost | $15 to $100 (materials only) | $150 to $400 (labor plus materials) |
| Time Investment | 3 to 6 hours spread over 1 to 2 days | 1 to 3 hours (single visit, including dry time) |
| Skill Required | Low to medium (patience and care) | High (years of experience, texture expertise) |
| Quality of Result | Good if careful, risk of visible patches | Excellent, often invisible when done right |
| Best For | Small holes, no time pressure, homeowners | Medium/large holes, rentals, tight deadlines |
Cost Breakdown for North Hollywood Repairs
Money matters. Whether you’re budgeting for a single patch or managing turnover across multiple units, knowing what you’ll pay helps you plan and avoid surprises. Repair costs in North Hollywood and greater Los Angeles vary based on damage size, wall condition, and whether you’re hiring a general handyman or a drywall specialist. Here’s what to expect in 2026.
DIY Material Costs
If you’re going the DIY route, here’s a realistic breakdown of what you’ll spend at a local hardware store or home center:
- Lightweight spackle or joint compound (small tub): $5 to $10
- Self-adhesive mesh patch or drywall patch kit: $8 to $15
- Putty knives (3-inch and 6-inch): $6 to $16 total
- Sandpaper or sanding sponge (multi-grit pack): $4 to $6
- Primer (small can): $8 to $12
- Paint (sample or quart, if you don’t have leftovers): $5 to $15
- Optional tools (drop cloth, tape, sanding block): $5 to $10
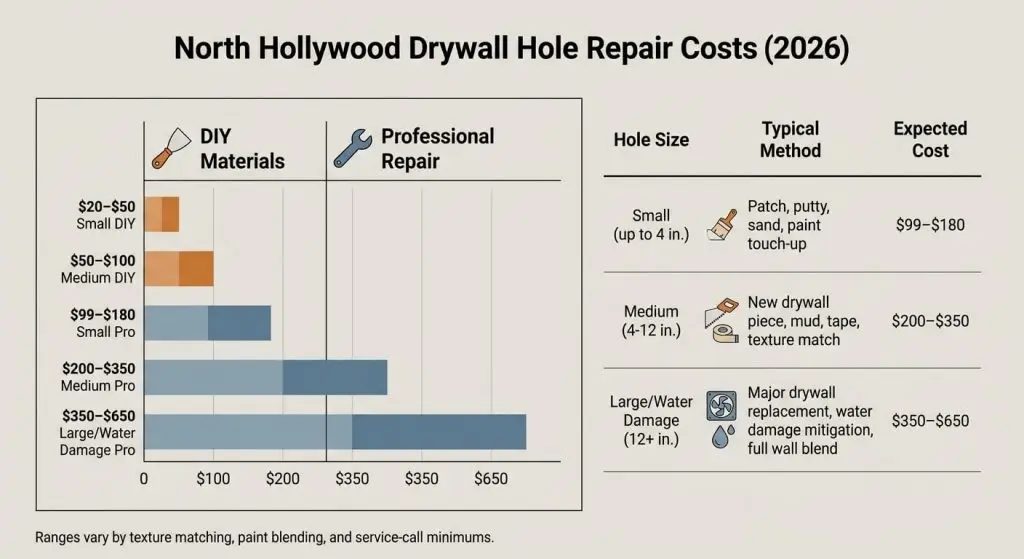
Small repairs (under 1 inch): expect to spend $20 to $50 total if you’re starting from scratch. Medium repairs (1 to 6 inches, multiple patches): budget $50 to $100 to cover compound, larger patches, and extra paint or primer.
Professional Service Costs
Hiring a handyman or drywall specialist in North Hollywood typically involves a service call fee plus labor. Here’s the pricing landscape for 2026:
Hourly rates: LA-area handymen charge $75 to $150 per hour depending on experience and insurance coverage. Average hourly rate in North Hollywood is around $76 to $100.
Service call minimums: Most pros charge a minimum trip fee ranging from $100 to $150, which usually covers the first 1 to 2 hours of work. Additional time is billed at the hourly rate, often $45 to $75 per hour after the minimum.
Flat-rate per patch: Some drywall specialists offer flat pricing. Small doorknob holes (under 4 inches) typically cost $99 to $180 per patch. Medium holes (4 to 12 inches) run $200 to $350. Large section repairs or water damage can reach $350 to $650 depending on scope.
Combined door hardware and drywall: If you need a doorknob replaced and a hole patched in one visit, expect total costs between $150 to $300 for a single location. Multiple doors and patches in one trip can push the total to $425 to $600 or more, but per-item costs drop when bundled.
What Affects Final Cost
Several variables influence the final bill. Understanding these helps you avoid sticker shock and negotiate fairly.
Damage size and depth: Larger holes need more material, more coats, and more labor. A 6-inch hole costs significantly more than a 2-inch one because the process involves backing, multiple compound layers, and more extensive sanding.
Wall texture: Smooth walls are easier to patch invisibly. Orange-peel, knockdown, or popcorn textures require specialty tools and techniques, often adding $50 to $150 to the job.
Paint matching: If your walls are an unusual color or have faded over time, matching paint can be tricky. Some pros charge extra for custom color mixing or multiple paint coats to blend the repair.
Drywall condition: Older, brittle drywall or plaster walls take more time and care. If surrounding material is crumbling, the pro may need to stabilize a larger area, increasing labor.
Same-day or emergency service: If you need the repair completed within 24 to 48 hours, expect surcharges ranging from $50 to $100 for priority scheduling.
Renter vs. Homeowner: Know Your Rights and Responsibilities
Who pays for the repair often depends on whether you rent or own and how the damage occurred. Renters need to understand lease terms and landlord obligations. Homeowners have full control but also full responsibility. Either way, knowing your rights and responsibilities prevents disputes and protects your wallet.
For Renters: Documentation and Communication
If you’re renting in North Hollywood and discover a doorknob or punch hole, your first step is to notify your landlord in writing. Take clear photos of the damage from multiple angles and send them via email or text so you have a timestamped record. This documentation protects you if disputes arise later about who caused the damage or whether it was pre-existing.
Many leases hold tenants responsible for damage beyond normal wear and tear. A doorknob hole from careless use typically falls into tenant responsibility. That said, if the door lacked a proper stop or the wall was already weakened, you may have a case for shared responsibility. Communicate openly with your landlord. Offer to coordinate the repair yourself if you’re comfortable with DIY, or ask for recommendations on local handymen. Some landlords will deduct repair costs from your deposit; others will bill you directly. Getting it in writing avoids confusion later.
For Homeowners: Budget and Timeline
Homeowners have the freedom to choose their repair approach and timeline. If you’re planning to sell, factor wall repairs into your staging budget. Buyers notice holes, and even small damage can raise questions about overall maintenance. For rental property owners, wall repairs are part of routine turnover. Bundling multiple repairs into one contractor visit reduces per-item costs and speeds up unit readiness.
Consider timing your repairs strategically. If you’re repainting a room anyway, tackle drywall patches first so you can prime and paint everything together. This saves money and ensures a seamless finish. Budget $150 to $400 per room for professional patching and painting if you’re handling turnover or preparing for a sale.
Finding and Vetting a Local Professional
Choosing the right contractor makes the difference between a repair that disappears and one that screams “patch job” under the right light. North Hollywood has dozens of handymen and drywall specialists, but not all deliver quality work at fair prices. Knowing how to vet candidates protects you from overpaying or getting stuck with sloppy results.
Questions to Ask Before Hiring
Don’t hire the first name you find on Google. Ask these questions to filter out unreliable contractors:
Are you licensed and insured? In California, contractors working on projects over $500 should carry a license and liability insurance. Ask for proof and verify the license number online.
Do you offer a warranty on your work? Reputable pros stand behind their repairs. Look for warranties ranging from 90 days to five years.
What’s your timeline? For urgent repairs, confirm availability and turnaround. Some pros offer same-day or next-day service for an additional fee.
Can you provide an exact cost estimate before starting? Avoid vague quotes. Request a detailed breakdown showing labor, materials, and any potential surcharges.
Do you have references or recent reviews? Ask for contact info for past clients or check online reviews on Google, Yelp, or Thumbtack. Look for patterns in feedback about quality, punctuality, and pricing transparency.
Where to Find Vetted Contractors
Start your search on platforms that aggregate reviews and ratings. Google Business listings show recent customer feedback and response rates. Yelp filters for highly rated local handymen and drywall specialists. Thumbtack offers background-checked contractors with pricing estimates and hire counts. Local Facebook groups for North Hollywood or San Fernando Valley residents often have recommendations and firsthand experiences.
Read recent reviews carefully. Look for mentions of texture matching, clean work sites, and fair pricing. Red flags include multiple complaints about hidden fees, poor communication, or visible patch lines. Trust your gut if something feels off during initial contact.
Special Considerations for North Hollywood Properties
North Hollywood’s housing stock includes everything from mid-century apartments to newer condos. Older buildings present unique challenges that affect repair techniques and costs. If you’re working on a property built before 1980, expect quirks that modern drywall doesn’t have.
Older Drywall and Plaster Walls
Many North Hollywood homes and apartments from the 1940s through the 1970s feature plaster walls over wood or metal lath instead of modern drywall. Plaster is harder and more brittle than drywall. It doesn’t take joint compound the same way, and patching requires specialized materials like bonding plaster or patching plaster. If you’re unsure whether your walls are plaster or drywall, knock gently. Drywall sounds hollow; plaster sounds solid.
Attempting a standard drywall patch on plaster usually fails. The compound won’t bond properly, and the repair cracks or pulls away within weeks. If your building has plaster walls, hiring a pro with plaster experience is the smarter move. They’ll use the right materials and techniques to ensure a lasting repair. Expect slightly higher costs due to the specialized knowledge required.
Textured vs. Smooth Finishes
Wall texture varies widely across North Hollywood properties. Newer builds often have smooth or lightly textured walls. Older apartments and homes may feature heavy orange-peel, knockdown, or even popcorn textures. Matching texture is one of the hardest parts of a drywall repair, and it’s where DIY attempts often fall short.
Smooth walls are the easiest to patch invisibly. You sand the compound flat, prime, and paint. Textured walls require replicating the pattern using a spray gun, roller, or specialized brush. Without practice, texture matching often looks off, creating a visible patch that draws the eye. If your walls have anything beyond light texture, seriously consider hiring a pro. The cost difference is often only $50 to $100, but the result is a repair that truly disappears.
Preventing Future Damage
Once your wall is patched and painted, the last thing you want is another hole in the same spot six months later. Prevention is cheap and easy. A few simple changes protect your walls and save you from repeating this entire process.
Doorknob Hole Prevention Tips
Stop the problem at its source. These small adjustments prevent doorknobs from damaging walls:
- Install door stops. Wall-mounted or door-mounted rubber stops cost under $5 and absorb the impact when a door swings open.
- Add doorknob wall shields. Circular adhesive pads mount on the wall behind the doorknob, protecting drywall from repeated impacts.
- Adjust door hinges. If a door swings open too far or too fast, tightening or adjusting the hinges can reduce the force of impact.
- Use soft-close hinges. For doors that get heavy use, consider upgrading to soft-close hinges that prevent slamming.
- Check door alignment. Doors that stick or drag often get forced open harder, increasing impact risk. A quick adjustment can prevent this.
Protecting Walls from Accidental Impact
Beyond doorknobs, everyday life can damage drywall. A few proactive steps keep your walls looking good:
- Corner guards. Install clear plastic or rubber corner guards in high-traffic hallways to protect wall corners from furniture, vacuum cleaners, and foot traffic.
- Furniture placement. Position beds, desks, and chairs away from walls so people aren’t leaning against or kicking drywall regularly.
- Teach kids to be gentle. If you have young children, explain that walls aren’t punching bags or soccer goals. Small reminders go a long way.
- Routine inspections. Walk through your home or rental units every few months and check for new dings or cracks. Catching damage early means easier, cheaper repairs.
Looking for professional help with doorknob or punch hole damage in North Hollywood? Precision Patch Pros specializes in invisible, texture-matched drywall repairs backed by a five-year guarantee. They serve the San Fernando Valley and can provide a fast quote based on photos of your damage.
Key Takeaways: Your Doorknob Repair Action Plan
You’ve reached the end of this guide, and now you’re armed with the knowledge to handle doorknob and punch hole repairs confidently. Here’s your quick-reference action plan:
- Assess first. Measure the hole and check the surrounding drywall condition. Small holes under 1 inch are easy DIY. Medium holes up to 6 inches are manageable with patience. Large holes or structural damage call for a professional.
- DIY saves money but takes time. Budget $20 to $100 for materials and plan on 3 to 6 hours of work spread over a day or two. Follow the steps carefully: prepare, patch, compound, sand, prime, and paint.
- Pros deliver speed and quality. Expect to pay $150 to $400 for professional repairs in North Hollywood. Flat-rate pricing often makes sense for small jobs. Hourly rates work better when bundling multiple repairs.
- Prevention pays off. Install door stops and wall shields after the repair. Adjust door hinges and teach household members to be gentle. A $5 door stop prevents a $200 repair bill.
Whether you fix it yourself or hire a pro, addressing doorknob and punch holes promptly protects your property value, keeps landlords happy, and ensures your walls look their best. Take action today, and you’ll be glad you did.
Frequently Asked Questions
How much does a doorknob hole repair cost in North Hollywood in 2026?
DIY repairs typically cost $20 to $50 for materials. Professional repairs range from $99 to $180 for small holes and $200 to $350 for medium holes, depending on texture matching and paint blending needs.
Can I fix a doorknob hole in drywall myself if I’ve never done it before?
Yes, small holes under 1 inch are beginner-friendly. Follow the step-by-step process: clean the hole, apply spackle, sand smooth, prime, and paint. Medium holes require a patch and more patience, but they’re still manageable for first-timers willing to take their time.
How long does a professional doorknob hole repair take?
Most pros complete small to medium repairs in 1 to 3 hours, including drying time for fast-setting compounds. If texture matching or multiple coats are needed, the process may extend to a full day or require a follow-up visit.
Do I need to match wall texture when repairing a doorknob hole?
Yes, if your walls have orange-peel, knockdown, or popcorn texture. Without matching, the patch will be visible under certain lighting. Smooth walls are easier to patch invisibly. If texture matching intimidates you, hire a pro.
Will my landlord charge me for a doorknob hole in my North Hollywood apartment?
Most likely, yes. Doorknob holes are usually considered damage beyond normal wear and tear. Document the damage with photos and communicate with your landlord in writing. Offering to coordinate or pay for the repair upfront may help you negotiate a lower charge or avoid deposit deductions.
Should I repair the drywall before or after replacing the doorknob?
Repair the drywall first. This ensures the wall is structurally sound and gives you a clean surface to work around when installing the new doorknob. After the repair is complete, install a door stop to prevent future damage.
What’s the difference between a California patch and a Texas patch?
A California patch involves cutting a square piece of drywall and attaching it to backing material inserted into the wall. A Texas patch cuts the drywall piece with paper edges that fold out, eliminating the need for backing. Both methods work for medium holes and provide durable results when done correctly.
How do I prevent doorknob holes from happening again?
Install a rubber door stop on the wall or door to absorb impact. Add a doorknob wall shield, a circular adhesive pad that protects drywall from repeated hits. Adjust door hinges so the door doesn’t swing open too forcefully.