
Why the ‘Best’ Repair Method Depends on Your Damage Type
There isn’t a universal answer when choosing a drywall repair technique. The right approach hinges on the size of the damage, where it sits in your home, and how flawless the finished surface needs to look. A small nail hole in a closet won’t demand the same treatment as a fist-sized dent beside a brightly lit entryway. If you’re staring at a gash in your wall and feel stuck, you’re not alone. Most homeowners don’t instinctively know whether to grab a mesh patch, cut out a section, or simply spread compound over the spot. This guide walks you through each option, explaining when each method shines and when it falls short so you can make a confident choice.
Understanding Your Damage: The First Step
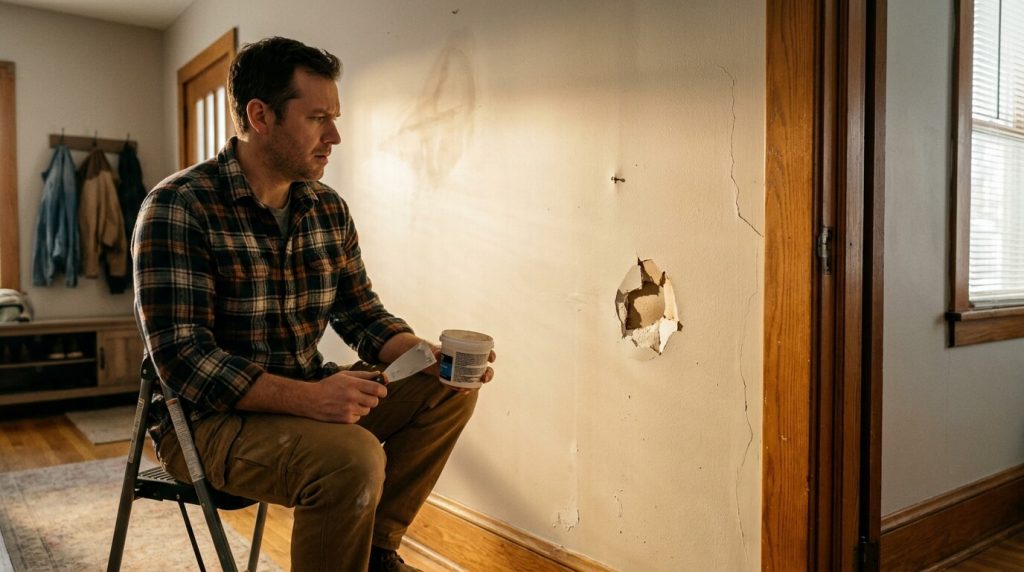
Before reaching for any tools, take a close look at what you’re dealing with. Damage falls into a handful of categories, and recognizing yours determines the entire repair path. Here’s a quick self-assessment checklist:
- Small holes and dents: Nail pops, screw dimples, and minor dings under an inch. These usually involve surface-level fixes and won’t compromise the structural panel.
- Medium to large holes: Door-handle impacts, accidental kicks, or removed fixtures that punch through the gypsum core. You’ll see a gap with torn paper edges.
- Cracks: Hairline fractures near corners, ceilings, or door frames. These can signal settling, impact stress, or seam failure.
- Water damage: Soft, sagging, or stained gypsum after a leak. The paper facing may peel, bubble, or feel spongy when pressed.
- Torn paper facing: Surface paper ripped away, but gypsum underneath remains solid. This looks messy but isn’t always deep.
Each type calls for different materials, techniques, and finish expectations. Identifying your damage correctly keeps you from over-building a simple fix or under-treating a serious problem.
The Three Main Drywall Repair Methods Explained
Professionals rely on three core approaches, each optimized for specific damage profiles and finish requirements. Understanding what separates them helps you pick the technique that balances speed, cost, and how well it disappears. Let’s break down how each works and where it fits best.
Method 1: Self-Adhesive Mesh Patch
Mesh patches offer speed and simplicity for small to medium holes. You peel the backing off a fiberglass mesh square, press it over the hole, then trowel joint compound across the surface in thin layers. The mesh stabilizes the compound and prevents it from sagging into the void. This method works well for damage between one and four inches, especially in low-traffic or dimly lit areas.
Pros: Fast application, minimal tools, and forgiving for beginners. You won’t need backing boards or precise measurements.
Cons: Under bright or raking light, mesh repairs can telegraph slightly. The compound shrinks more around the open weave, sometimes leaving a faint depression or visible grid pattern. Feathering and multiple coats help, but perfect invisibility is harder to achieve than with paper tape. If you’re repairing a high-visibility wall, consider whether the convenience trade-off makes sense.
Method 2: Paper Tape & Compound (Taping & Mudding)
Paper tape paired with joint compound is the traditional, time-tested method pros use for seams, cracks, and holes that demand smooth, invisible results. You embed paper tape in a thin bed of compound, then apply two or three additional coats, feathering each layer wider than the last. Between coats, you sand lightly and let everything cure completely.
This approach requires patience and skill. Each coat must dry fully before the next, and sanding technique makes the difference between a seamless blend and a visible hump. When done right, paper tape repairs disappear even under harsh light. The extra time and practice pay off in finish quality, which is why contractors default to this method for living rooms, hallways, and any space where guests will see the wall.
Best for: Seams, medium holes, cracks, and scenarios where flawless finish outweighs speed. Expect three coats for taped seams and two for smaller patches.
Method 3: Cut-Out & Replacement Patch
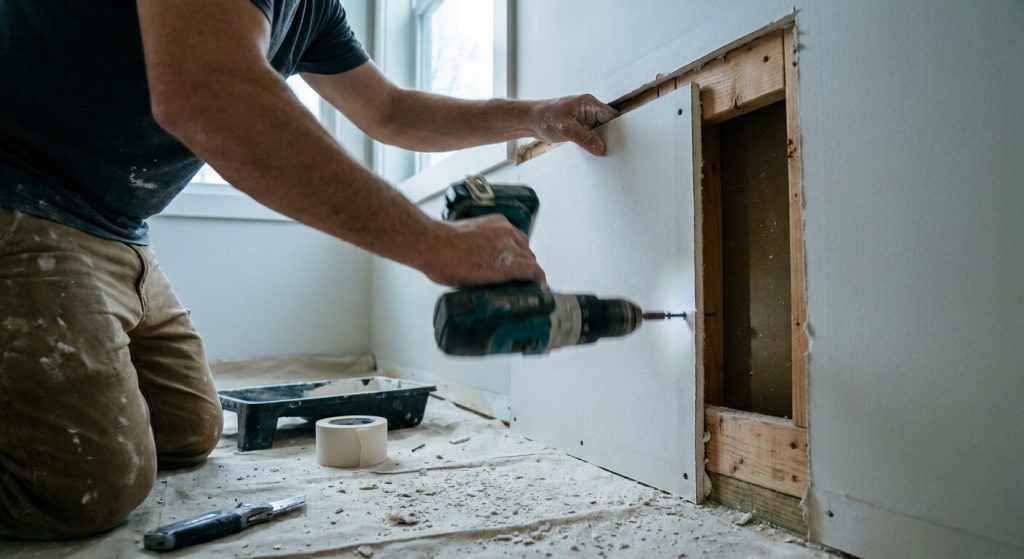
When damage extends beyond a few inches, the gypsum core is crushed or water-damaged, or a structural crack has compromised the panel, cutting out the damaged section and installing a fresh piece of drywall is the cleanest path. You measure and cut a square or rectangle around the damage, anchor backing boards or cleats behind the opening, then screw a new drywall piece into place. From there, you tape seams, apply compound, and finish as you would any joint.
This method costs more upfront (materials and labor), but it guarantees a solid substrate with no weak spots. It’s non-negotiable for water damage, where soft gypsum won’t hold compound, or for large holes where patching would leave a bulge or hollow feel. Many homeowners hope a smaller patch will work, but cutting out and replacing avoids repeated failures and delivers long-term stability.
When to choose it: Holes larger than six inches, water-logged panels, structural cracks, or repeated patch failures.
Comparison Table: Methods at a Glance
| Method | Damage Size | Finish Quality | Time to Complete | Cost Range | Visibility Under Raking Light | Skill Level Required |
|---|---|---|---|---|---|---|
| Mesh Patch | 1–4 inches | Good | 1–2 days (with drying) | $3–$8/sq ft | Can show slight texture | Beginner-friendly |
| Paper Tape & Compound | Seams, cracks, 2–6 inches | Excellent | 2–4 days (multiple coats) | $8–$14/sq ft | Invisible when done well | Intermediate to advanced |
| Cut-Out & Replacement | 6+ inches, water damage | Excellent | 1–3 days (depends on size) | $14–$18+/sq ft | Invisible | Intermediate |
Note: Finish quality varies with application technique and lighting conditions. Pricing reflects typical professional rates including labor and materials in 2026. Actual costs fluctuate by region and job complexity.
How to Choose the Right Method for Your Situation
Match your repair approach to the context, not just the damage. Here’s a practical decision tree:
Scenario 1: Rental unit before move-out
Small nail holes or picture-hanger dents in non-critical spots. You need your deposit back but won’t be living there. Choice: Spackle or mesh patch with two coats. Speed and cost matter more than perfection.
Scenario 2: Small nail hole in a dark corner
Minimal light exposure, low traffic. Choice: Mesh patch or even spackle. Quick, inexpensive, and the imperfection won’t be noticed.
Scenario 3: Major water stain in the living room
Visible daily, bright lighting, and the gypsum feels soft. Choice: Cut out the damaged section, replace with new drywall, tape, and finish with paper tape. Attempting a surface patch will fail within months.
Scenario 4: Crack along a ceiling seam
Structural settling or poor original taping. Choice: Paper tape and compound over the entire seam, feathered wide. Mesh won’t hold a crack repair reliably long-term.
Context drives method. Consider who sees the wall, how light hits it, and whether you’re solving the problem once or just delaying a bigger repair.
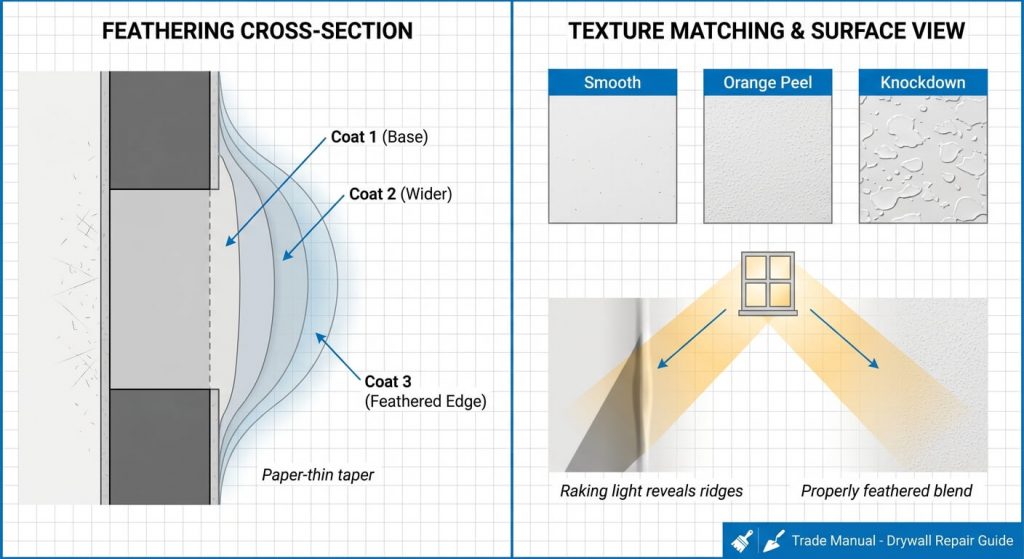
The Professional Difference: Texture Matching & Feathering
Two techniques separate invisible repairs from obvious patches: texture matching and feathering. Professionals spend as much time blending edges and duplicating wall finish as they do applying compound.
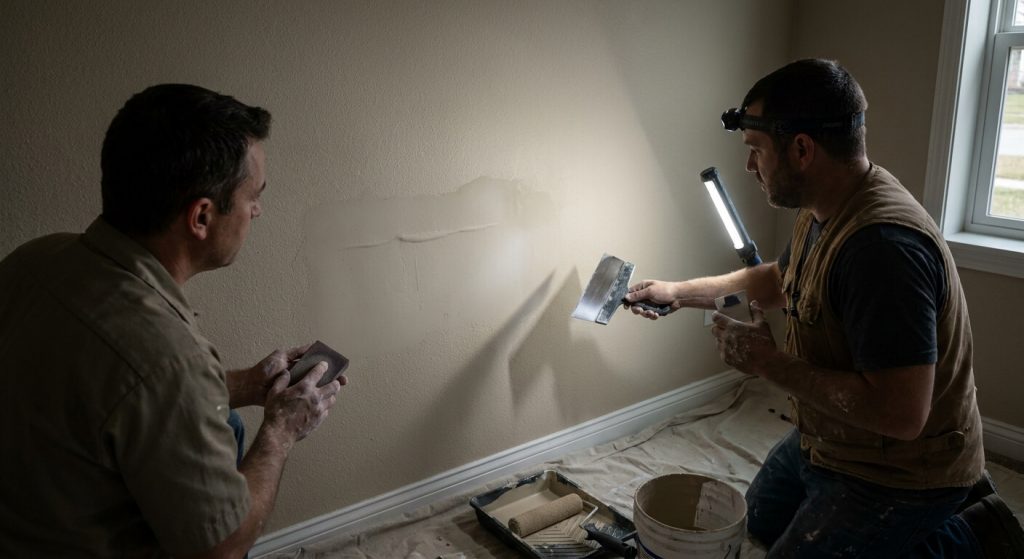
Feathering means spreading each coat of compound progressively wider, thinning the edge until it’s paper-thin and virtually undetectable. The first coat might cover the patch itself, the second extends six inches beyond, and the third feathers out twelve inches or more. Sanding between coats smooths ridges without creating new ones. Done right, you can’t tell where the repair ends and the original wall begins.
Texture matching addresses the surface finish (whether smooth, orange peel, or knockdown). After your patch dries and sands flat, you replicate the existing texture using a spray gun, roller, or trowel, depending on the pattern. Getting the depth, spacing, and orientation to match requires practice and the right tools. Skipping this step leaves a flat patch surrounded by textured wall, a dead giveaway even under dim light.
Why This Matters: Raking light (the angled illumination from windows or sconces) reveals every ridge, dip, and texture mismatch. Paint sheen amplifies these flaws. A patch that looks fine under overhead light can stand out starkly at sunrise or sunset. Professionals factor in lighting conditions and wall age, adjusting their feathering width and texture technique accordingly.
If you want drywall repair to truly disappear, invest the extra time in wide feathering and precise texture replication. These steps aren’t optional if quality is the goal.
Tools & Materials You’ll Need for Each Method
For Mesh Patch:
- Self-adhesive fiberglass mesh patch
- Joint compound (pre-mixed or powder)
- Putty knife or taping knife (4- and 6-inch)
- Sanding block or fine-grit sandpaper
- Primer and paint
For Paper Tape & Compound:
- Paper drywall tape
- Joint compound (setting compound for base, topping compound for finish coats)
- Taping knife (6-inch, 10-inch, 12-inch for progressive coats)
- Mud pan
- Sanding sponge or pole sander
- Stain-blocking primer (if exposed paper or stains present)
- Paint matching the wall
For Cut-Out & Replacement:
- Drywall saw or utility knife
- Replacement drywall piece (cut to size)
- Backing boards or wood cleats
- Drywall screws and drill
- Paper tape and joint compound
- Taping knives (multiple widths)
- Sanding tools
- Primer and paint
Having the right tools on hand prevents mid-job trips to the hardware store and ensures each step can be completed to standard.
Cost Breakdown: What to Expect at Different Quality Levels
Repair pricing reflects labor skill, materials, finish expectations, and minimum service thresholds. Here are three typical tiers for 2026:
Budget Patch ($3–$8/sq ft):
Basic mesh or paper patch with compound, minimal feathering, no texture matching. Works for closets, garages, or prep for full repainting. Expect visible seams under close inspection or bright light.
Mid-Range Professional ($8–$14/sq ft):
Paper tape, multiple coats with proper drying, moderate feathering, and primer. Texture blending for orange peel or knockdown included. Suitable for living areas, bedrooms, and most residential repairs. The patch won’t stand out during normal use.
Premium Finish ($14–$18+/sq ft):
High-expectation smooth finish or complex texture matching under critical lighting. Wide feathering, fine sanding, stain-blocking primer, and paint touch-ups. This tier applies to accent walls, gallery spaces, high-end homes, and commercial interiors where perfection is non-negotiable.
Many contractors impose a minimum service fee of $350–$650 per visit, meaning even a small hole can cost the minimum if travel and setup are involved. For larger projects across multiple rooms, per-square-foot pricing becomes more economical. Always ask how the pro structures their quote (whether hourly, per square foot, or flat fee) and what’s included in the scope.
Better work costs more. That’s not a flaw in the system; it’s a reflection of skill, time, and guaranteed results. If you need to know more about transparent pricing for professional drywall repair in Southern California, you can explore detailed service information here.
Common Mistakes That Ruin a Drywall Repair
Even well-intentioned DIYers trip over a few common errors. Avoid these to save time, materials, and frustration:
- Skipping primer on exposed paper: Unprimed paper absorbs moisture from the compound, causing bubbles and poor adhesion. Always seal torn or exposed paper facing with stain-blocking primer before applying mud.
- Applying too-thick coats: Thick layers crack as they dry and shrink unevenly. Professionals apply thin coats (two or three), allowing each to cure fully before the next.
- Inadequate feathering: Stopping your compound at the edge of the damage creates a visible ridge. Feather each coat progressively wider, blending into the surrounding wall.
- Rushing between coats: Applying a new layer before the previous one dries traps moisture, leading to soft spots and cracks. Patience pays.
- Ignoring texture matching: Leaving a smooth patch on an orange-peel or knockdown wall advertises the repair. Match the texture or plan to repaint the entire wall.
Professionals build these steps into their workflow automatically. If you’re DIYing, slow down and follow the sequence.
DIY vs. Professional Repair: What You Should Know
DIY makes sense for small, low-visibility repairs where you have time to learn and experiment. A nail hole in a guest bedroom or a dent behind furniture won’t demand perfection, and tackling it yourself saves the minimum service fee. You’ll spend a few dollars on materials and a couple of evenings on application and sanding.
Hiring a professional is worth the investment when:
- The damage is large, complex, or water-related.
- The wall sits in a high-traffic or highly visible area.
- You’re working with textured finishes like knockdown that require specialized tools.
- You’re on a tight timeline (such as preparing a home for sale or a tenant move-in).
- Previous DIY attempts have failed or made the problem worse.
Professionals bring speed, finish quality, and a guarantee. They also own the tools, understand drying times, and can match textures you’d struggle to replicate. Hidden costs of DIY include wasted materials from mistakes, extra paint, and the time spent learning by trial and error. For critical repairs, a pro saves money and delivers results that last.
Pro Tips for Invisible Results
Pro Tip 1: Use progressively finer-grit sandpaper as you feather wider. Start with 120-grit to knock down high spots, then finish with 220-grit for a smooth, paint-ready surface. Coarse paper leaves scratches that telegraph through paint.
Pro Tip 2: Prime the entire patched area before final painting to catch imperfections. Primer reveals ridges, dips, and texture mismatches you can’t see on bare compound. Touch up any flaws before rolling on your finish coat.
Pro Tip 3: Work in natural daylight to see actual finish quality. Overhead shop lights flatten shadows and hide irregularities that raking sunlight will expose. Step back, check from multiple angles, and don’t rush final sanding.
These small adjustments take results from ‘good enough’ to invisible. They’re what pros do differently, and they’re learnable with practice.
When to Call a Professional Repair Specialist
Certain red flags signal a job should go to an experienced repair specialist:
- Water damage: Soft or sagging gypsum can hide mold or structural issues. Pros know when to cut deeper and how to confirm the leak source is resolved.
- Structural cracks: Cracks that return after patching may indicate foundation movement or framing issues. A specialist can diagnose the root cause and recommend the right fix.
- Textured finishes: Orange peel and knockdown textures are hard to match without the right spray equipment and technique. Professionals replicate them seamlessly.
- Dark accent walls or high-gloss paint: These finishes magnify every flaw. Repairs must be flawless to avoid visible patches under critical lighting.
- High-traffic visible areas: Entryways, living rooms, and hallways see daily scrutiny. The repair must disappear, not just cover the hole.
- Time constraints: If you’re selling, renting out, or hosting an event, a pro can complete the work in a single visit with guaranteed results.
Even if you’re comfortable DIYing, some scenarios justify professional help. Recognizing when to call in expertise prevents repeated failures and wasted effort. For fast, guaranteed repairs across Bakersfield, Antelope Valley, and the Santa Clarita area, a licensed specialist can handle the job and make the damage disappear. Learn more about professional drywall repair services and get a quote in minutes.
Key Takeaways: Choosing Your Best Drywall Repair Method
- Assess damage size and type first: Small holes, cracks, and large water-damaged sections each require different approaches.
- Consider finish expectations and lighting: High-visibility walls and bright, raking light demand wider feathering and texture matching.
- Match method to job scope: Mesh patches for speed, paper tape for quality, cut-out replacement for structural integrity.
- Invest in proper tools and materials, or hire a pro: Skimping on prep or technique leads to visible, short-lived repairs.
- Prioritize texture matching and feathering for invisible results: These steps separate amateur patches from professional finishes.
Ready to tackle your wall, or ready to hand it off to a skilled team? Either way, understanding the best method for your damage ensures the repair actually solves the problem.
Frequently Asked Questions
What drywall repair method is best for large holes?
For holes larger than six inches, cutting out the damaged section and replacing it with a new drywall piece secured to backing boards is the most reliable method. Mesh or paper patches can’t stabilize large voids, and attempting them risks sagging, cracking, or visible bulges.
How many coats of joint compound do professionals apply for drywall seams and patches?
Professionals typically apply three coats for taped seams and two coats for small patches. Each coat must dry fully before the next, with light sanding in between to smooth ridges and prepare for the next layer. Rushing this sequence causes cracks and a poor finish.
When should I use a mesh patch versus a California paper patch versus cutting out and replacing drywall?
Use a mesh patch for small to medium holes in low-visibility areas where speed matters. A California paper patch (where drywall paper extends beyond the gypsum to form a flange) works well for medium holes when you want a cleaner finish than mesh but can’t access studs. Cut out and replace when the hole is large, the gypsum is water-damaged, or structural integrity is compromised.
How do drywall contractors calculate per square foot pricing, and how do minimum service fees affect small jobs?
Contractors price repairs per square foot based on damage size, finish complexity, and texture requirements (typically ranging from three to eighteen dollars per square foot in 2026). Many impose minimum service fees of $350 to $650 per visit, meaning even a tiny hole costs the minimum if travel and setup are required. For larger multi-room projects, per-square-foot pricing becomes more economical.
What is the best method to repair torn drywall paper and prevent bubbling when applying joint compound?
First, seal the exposed paper with stain-blocking primer to prevent moisture absorption. Once dry, apply thin coats of joint compound, feathering edges progressively. Skipping primer causes bubbles, poor adhesion, and visible defects after painting.
How do professionals match existing orange peel or knockdown texture after repairing drywall, and how much more does texture blending cost per square foot?
Pros use spray guns, rollers, or hand trowels to replicate the depth, spacing, and pattern of the existing texture. Texture blending adds roughly one to four dollars per square foot to the base repair cost, depending on complexity and finish expectations. Matching knockdown or heavy orange peel requires specialized equipment and practice.
Why do some drywall repair jobs cost $8 to $18 per square foot for a smooth finish, and what extra steps are required under bright lighting conditions?
High-expectation smooth finishes demand extra-wide feathering, multiple fine-sanding passes, stain-blocking primer, and meticulous inspection under raking light. Bright lighting reveals every imperfection, so pros invest more time ensuring flatness and invisibility. This tier applies to accent walls, galleries, and commercial spaces where quality is non-negotiable.
When should drywall be replaced instead of repaired?
Replace drywall when the gypsum core is crushed, water-damaged and soft, or when structural cracks indicate movement or framing issues. Attempting to patch compromised panels wastes time and materials, leading to repeated failures. Cut-out replacement guarantees a solid, long-lasting substrate.